How to install Wazuh & The Hive (step by step)
- Souleymane Diallo
- Jan 21
- 4 min read

Acknowledgment: The success of this project was significantly enhanced by the guidance and resources available on the MyDFIR YouTube channel. Their detailed tutorials and expert insights played a crucial role in shaping the development of this lab.
Objective:
The objective of this lab is to install and configure Wazuh and TheHive applications on virtual machines, set up firewall rules, and ensure secure access via SSH.
Skills Learned:
Installing and configuring virtual machines (VMs)
Installing Wazuh and TheHive applications
Managing firewall rules and SSH access
Installing dependencies for TheHive
Tools Used:
Virtual Machines (VMs)
Wazuh Server
TheHive
Ubuntu 22.04 LTS
Firewall setup (Droplets/Networking)
SSH clients (PuTTY or Droplet Console)
Command-line utilities (apt, curl, systemctl)
Step-by-Step Instructions
1. Install Wazuh Server
Create a Droplet (Virtual Machine) for Wazuh:
Click on “Create” at the top right corner and select ‘Droplets’.

Choose the following specifications:
Region: Your preferred region (e.g., New York, Toronto)

Image: Ubuntu 22.04 LTS (Basic)

Size: 8 GB RAM, 160 GB SSD, 5TB transfer
CPU: Premium Intel
Plan: $48/month

Select Password for the authentication method and create your root password.

Change Hostname to something identifiable, e.g., ‘Wazuh’.

Click ‘Create Droplet’.

Set Up a Firewall for Wazuh:
On the left-hand corner, go to Networking → Firewalls → Create Firewall.

Name the firewall (e.g., ‘Firewall’). By default SSH is open to the public.

Under Inbound Rules, change from SSH to All TCP and specify your public IP address as the source. (You can easily find your IP address by searching "What is my IP address" in a web browser. The result will typically appear at the top of the search results, allowing you to copy and paste it directly.)

Repeat the same step for UDP.

Click ‘Create Firewall’.

The purpose of creating a firewall and limiting access to only our IP address is to establish a security rule that restricts access to our virtual machine exclusively to us. Without this measure, our VM would be exposed to the public internet, potentially compromising its security.
Associate the Firewall with Wazuh Droplet:
Go to Droplets on the left-hand side.

Select your ‘Wazuh’ droplet.

Go to Networking,

Scroll down and click on ‘Edit’ on the ‘Firewalls’ settings.

Select the firewall you created earlier, then click on the ‘Droplets’ tab and ‘Add Droplets’, search for Wazuh, and add it.


Access the Wazuh VM:
You can access your Wazuh machine via:
PuTTY (for SSH)
Type in your Wazuh VM public IP address, and click on ‘Open’

if it is your first time accessing the Wazuh VM, you will be presented with this screen, click ‘Accept’

You will be login into your Wazuh VM as root. So type in ‘root’ and enter your password.

If everything was entered correctly, you should be able to login and will be presented with the following screen

Or go to Droplets, select Wazuh, and use the Launch Droplet Console option.

Update and Upgrade the Wazuh VM:
Once connected to the machine, run the following commands to update and upgrade:
sudo apt-get update && sudo apt-get upgrade -y

Hit enter then in the next following screens

Install Wazuh:
Install Wazuh by running the command below:
curl -sO <https://packages.wazuh.com/4.7/wazuh-install.sh> && sudo bash ./wazuh-install.sh -a

Keep the admin username and password provided after installation. You'll need it to log into the Wazuh dashboard.

Access Wazuh Dashboard:
Copy the public IP address of the Wazuh server.

Open a web browser and navigate to https://<your-wazuh-public-ip>. Click on ‘Advanced’
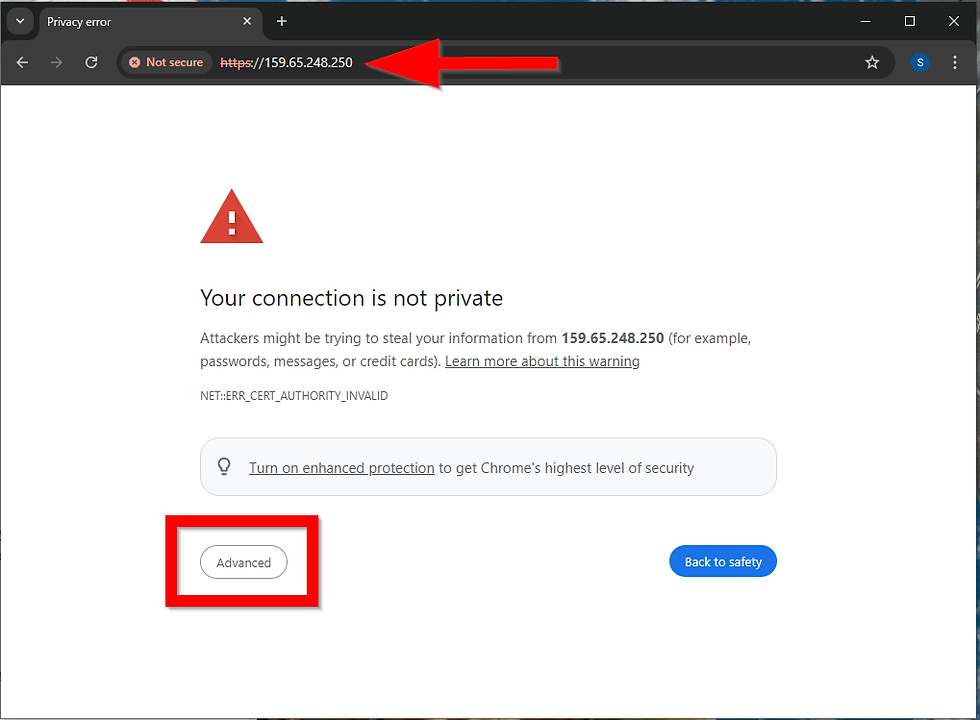
Click on ‘Proceed to<your-wazuh-public-ip>'

Log in using the credentials provided during installation.

2. Install TheHive
Create a Droplet (Virtual Machine) for TheHive:

Repeat the process to create another VM:

Image: Ubuntu 22.04 LTS
RAM: 8 GB (16 GB recommended)
HDD: 50+ GB
CPU: Premium Intel
Authentication Method: Password


Name the VM ‘thehive’.

Click ‘Create Droplet’.

Set Firewall for TheHive:
Edit the firewall settings as you did for Wazuh.

Add ‘TheHive’ droplet to the same firewall used for Wazuh.


SSH into TheHive VM and install required dependencies:
Use SSH to connect to TheHive.

Update and upgrade ‘thehive’ by running the following command:
sudo apt-get update && sudo apt-get upgrade -y

Run the following command to install required dependencies:
sudo apt install wget gnupg apt-transport-https git ca-certificates ca-certificates-java curl software-properties-common python3-pip lsb-release

Click Enter

Install Java for TheHive:
Run the following commands to install Java:
wget -qO- https://apt.corretto.aws/corretto.key | sudo gpg --dearmor -o /usr/share/keyrings/corretto.gpg echo "deb [signed-by=/usr/share/keyrings/corretto.gpg] https://apt.corretto.aws stable main" | sudo tee -a /etc/apt/sources.list.d/corretto.sources.list sudo apt update sudo apt install java-common java-11-amazon-corretto-jdk echo JAVA_HOME="/usr/lib/jvm/java-11-amazon-corretto" | sudo tee -a /etc/environment export JAVA_HOME="/usr/lib/jvm/java-11-amazon-corretto"

Install Cassandra for TheHive:
wget -qO - <https://downloads.apache.org/cassandra/KEYS> | sudo gpg --dearmor -o /usr/share/keyrings/cassandra-archive.gpg echo "deb [signed-by=/usr/share/keyrings/cassandra-archive.gpg] <https://debian.cassandra.apache.org> 40x main" | sudo tee -a /etc/apt/sources.list.d/cassandra.sources.list sudo apt update sudo apt install cassandra

Install Elasticsearch for TheHive:
wget -qO - <https://artifacts.elastic.co/GPG-KEY-elasticsearch> | sudo gpg --dearmor -o /usr/share/keyrings/elasticsearch-keyring.gpg sudo apt-get install apt-transport-https echo "deb [signed-by=/usr/share/keyrings/elasticsearch-keyring.gpg] <https://artifacts.elastic.co/packages/7.x/apt> stable main" | sudo tee /etc/apt/sources.list.d/elastic-7.x.list sudo apt update sudo apt install elasticsearch

Install TheHive:
wget -O- <https://archives.strangebee.com/keys/strangebee.gpg> | sudo gpg --dearmor -o /usr/share/keyrings/strangebee-archive-keyring.gpg echo 'deb [signed-by=/usr/share/keyrings/strangebee-archive-keyring.gpg] <https://deb.strangebee.com> thehive-5.2 main' | sudo tee -a /etc/apt/sources.list.d/strangebee.list sudo apt-get update sudo apt-get install -y thehive

Conclusion:
By following the above steps, you have successfully installed and configured Wazuh and TheHive on virtual machines, set up firewalls, and secured access via SSH.


Comments