SOC Automation Project -Part 1
- Souleymane Diallo
- Jan 23
- 4 min read

Updated: Jan 27
Acknowledgment: The success of this project was significantly enhanced by the guidance and resources available on the MyDFIR YouTube channel. Their detailed tutorials and expert insights played a crucial role in shaping the development of this lab.
Objective:
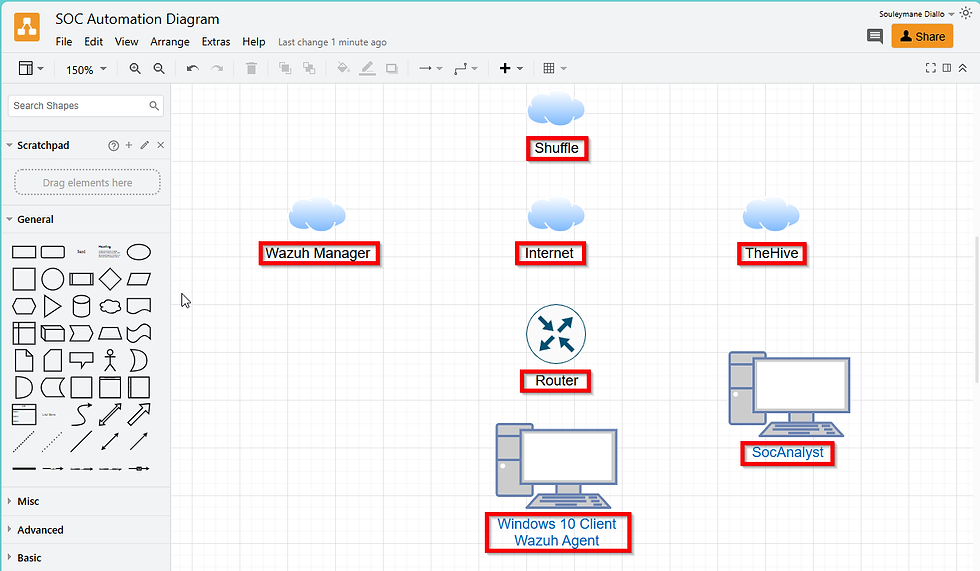
The goal of this lab is to design a visual diagram that outlines the logical flow of data for a full integration of a Wazuh instance with Shuffle and Hive, building a foundational security operations workflow. By the end of this lab, participants will have a visual reference to guide the future implementation of a case management system and security automation workflow.
Skills Learned:
Diagramming and visualizing a security operations workflow
Understanding data flow in security automation systems
Researching and troubleshooting errors during setup
Using online diagramming tools (draw.io)
Tools Used:
draw.io (Diagramming tool, free and accessible)
Step-by-Step Lab Instructions
Step 1: Understand the Lab Objective
The objective is to create a diagram for an integrated security operations system. The diagram will help you understand how data flows between different components (e.g., Windows 10 Client, Wazuh Manager, Shuffle, The Hive) in a security environment.
This exercise simulates a task you might encounter during cybersecurity job interviews, where you could be asked to diagram a security setup on a whiteboard.
Step 2: Open draw.io and Create Your Diagram
Navigate to draw.io (a free online diagramming tool).
Use the "Search Shapes" feature to find icons that represent the components of your security setup. Start by adding basic icons for:
Windows 10 Client (which will have a Wazuh agent installed)
Router
Internet (Cloud)
Wazuh Manager
The Hive
Shuffle
SOC Analyst Workstation
💡
Note: These icons don’t need to look visually perfect. The main goal is clarity in showing data flow.

Step 3: Label Your Diagram Components
Double-click each icon to label them. For example:
Label the PC icon as "Windows 10 Client Wazuh Agent"
Label the cloud icons as “Internet“, "Wazuh Manager”, "The Hive", and "Shuffle" to represent their locations in the cloud.
Duplicate the PC icon and label it "SOC Analyst."
💡
Tip: Keep the labels simple for now. You can always make it look prettier later.
Step 4: Create Connections Between Components
Use arrows to show the data flow between the different components:
Windows 10 Client → Router → Internet: Represent the client sending events to Wazuh.
Internet → Wazuh Manager: The Wazuh Manager receives the events.
Wazuh Manager → Shuffle: Wazuh sends alerts to Shuffle.
Shuffle → Internet: Shuffle performs open-source intelligence (OSINT) and enriches indicators of compromise (IOCs).
Shuffle → The Hive: Alerts are sent to The Hive for case management.
Shuffle → SOC Analyst: Emails are sent to the SOC Analyst for response.

Step 5: Customize Arrow Properties for Clarity
Change the arrow styles to indicate different types of actions:
Gray Arrows: Indicate event or alert flow.
Blue Arrows: Indicate alert notifications.
Green Arrows: Indicate enrichment of IOCs.
Orange Arrows: Indicate email communication.
Red Arrows: Indicate response actions.
Label arrows with their purpose in this order:
“Send Events” for the arrows from Windows 10 to the Wazuh Manager.
“Receive Events” for the arrow from internet to Wazuh Manager
“Send Alerts” for the arrow from Wazuh Manager to Shuffle.
“Enrich IOCS” for the arrow from Shuffle to Internet.
“Send Alerts” for the arrow from Shuffle to The Hive .
“Send Email” for the arrow from the shuffle to the internet.
“Send and Receive Email” for the arrow from Internet to SOC Analyst Workstation.
“Send Response Action” for the arrow from Shuffle to Wazuh Manager.
“Send Response Action” for the arrow from Shuffle to Soc Analyst Workstation.

Step 6: Finalize Workflow and Logic
Ensure the flow of data makes logical sense:
The Windows 10 Client sends events to the Wazuh Manager.
The Wazuh Manager triggers alerts based on those events and forwards them to Shuffle.
Shuffle enriches the alerts and sends them to The Hive for case management while simultaneously notifying the SOC Analyst via email.
The SOC Analyst sends a response action, which goes back to Shuffle, and eventually instructs Wazuh Manager to perform the required action on the Windows 10 Client.

Step 7: Review the Diagram
Review your diagram to ensure all components are connected logically.
Use different colors and labels to clearly distinguish between different data flows and actions.

Step 8: Wrap-up and Save
Save your diagram as it will serve as a reference in the next part of the lab series.
Congratulations! You’ve completed the first step in building your security automation workflow.

Key Takeaways:
This lab has helped you understand how data flows in a security operations environment, allowing you to design a visual representation.
The experience gained will enhance your ability to create and present diagrams, an important skill in cybersecurity job interviews.
The diagram created will be used as a reference for implementing the actual system in the next lab sessions.
Next Steps:
In the next lab, we will begin setting up the virtual machines and install the necessary tools to build our security system. Keep your diagram handy, as it will guide the next steps in building out this lab environment.
This concludes Part 1 of the SOC Automation Project series. (See Part 2 to continue)


Comments